Disable Lock Screen in Windows 11
The lock screen on Windows 11 is lovely, but is it possible to turn off the lock screen when you don’t need it? Here’s exactly how you can disable the lock screen on Windows 11.
1. Using Group Policy
The Group Policy Editor is a crucial tool for Windows administrators. You can change the requirements for passwords, startup programs, and other features. GPE is only available for Windows Professional, Ultimate, and Enterprise. Here’s how to use Group Policy to disable the lock screen on Windows 11: Step 1: To open the Run command box on your computer, press Win + R. Step 2: To open the Group Policy Editor, type gpedit.msc and press Enter. Step 3: Then proceed to the left-hand panel and select Computer Configuration > Administrative Templates > Control Panel > Personalization from the menu. Step 4: In the Personalization settings, double-click the Do not display the lock screen option. Step 5: A new window will pop up with the option’s detailed details. By default, the enabled option is selected, indicating that the lock screen is activated. Step 6: To turn off your system’s lock screen, select the Disabled button. Step 7: To complete the changes, click the Apply button and then the OK button. Step 8: Then, restart your computer. You will note that there is no lock screen and that you are immediately taken to the login screen.
2. Using Registry Editor
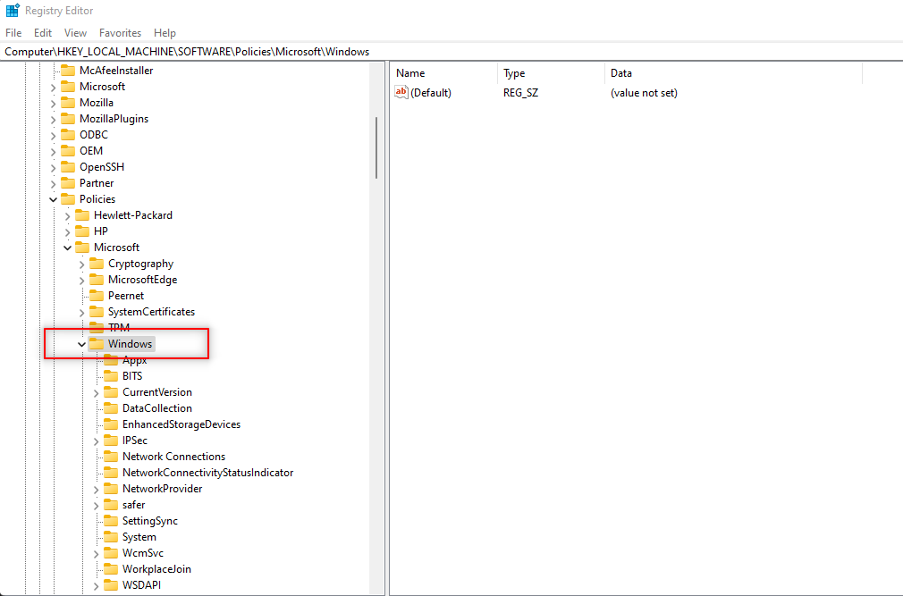
You can also disable Windows’ lock screen by modifying registry settings. However, for backup purposes, export a copy of your registry. In the event that the registry becomes corrupted, it will allow you to restore the prior settings. Here’s how you can get rid of the lock screen using the registry: Step 1: To open the Run command box, use the Win key + R. To open the Registry Editor, type regedit in the text input box and press the enter key. Step 2: Then, in the text input area, paste the following path and press the enter key: Computer\HKEY LOCAL MACHINE\SOFTWARE\Policies\Microsoft\Windows Step 3: Right-click on “Windows” from the left-hand panel. Then go to New > Key and name it as “personalisation”. Step 4: Select New > DWORD (32-bit) Value from the right-hand menu under Personalization. Name it as NoLockScreen. Step 5: Set the Value Data to 1 by double-clicking on the NoLockScreen value. Keep the hexadecimal base. Step 6: To apply the changes, click OK and restart your computer. When your computer starts up, you won’t see the lock screen anymore.
3. Using a Third-party Application.
You may also disable the lock screen on Windows 11 with a few clicks using a free third-party tool like WinAeroTweaker. To assist you with the process, refer to the instructions below. Step 1: Run the setup for WinAeroTweaker from here. Step 2: Then, follow the on-screen steps to customise the app to your settings. Step 3: Then activate it. Step 4: Under Boot and Logon, select Disable Lock Screen. Step 5: On your right, there’s an option as Disable Lock Screen. Check to enable it. Step 6: When prompted, restart your computer. Even if you aren’t prompted, we recommend restarting your computer. The lock screen on your Windows 11 system should be disabled after your PC restarts.
Additional Points
If you’re hoping for a more seamless experience while entering Windows and attempting to disable the lock screen, there are a few more steps you may take.
Disable Sign-in Password Requirement
When your PC wakes up from sleep, this option disables the sign-in requirement. To make the process easier, follow the instructions below. Step 1: First press Windows + I or launch Settings Step 2: Then, select Sign-in options from the menu. Step 3: Toggle the drop-down menu next to When should Windows prompt you to sign in again if you’ve been away? and then choose Never. Step 4: Your system’s sign-in requirements will now be disabled.
Disable Sign-in Requirement
All users on the existing system will no longer be required to use a password. This will make it much easier for you to get past the log-on page. To make the process easier, follow the instructions below: Step 1: To open the Run dialogue box, press Windows + R on your keyboard. Step 2: Type netplwiz and press Enter. You can also choose to click OK. Step 3: Remove the check mark from the box for Users must enter a user name and password to use this computer. Step 4: Choose Apply to make the changes. After that, click OK. If your Windows 11 is waking up from sleep or waking up after a power cycle, restart it for good measure. You should no longer be required to sign in.
Why Disable Lock Screen in Windows 11?
The first obstacle to going to the desktop is the Windows lock screen. It has a background image, the current date and time, and app notifications on it. However, if you don’t want to see any of those things, turning them off is a good idea. You can go straight to the desktop after removing the lock screen and entering your PIN or password. For a public computer, you can also set up a lock screen-free PC. Note that turning off the lock screen does not turn off the login screen. To access the system, you must still enter your PIN/password. To get to the desktop faster (and if privacy isn’t an issue), you can also remove the PIN/password required on the login screen. You now know the benefits and drawbacks of turning off the lock screen. Here are three simple ways to turn off the lock screen in Windows 11.
Is it a good idea to disable the lock screen on Windows 11?
Regardless of your needs, it is not suggested that you disable your lock screen. Since their introduction, modern computer gadgets have come a long way and are now an integral part of our daily lives. You may or may not be aware of the sensitive data saved on your device, but deactivating the lock screen puts that data in danger. By turning off the lock screen, unauthorised users will be able to gain access to your computer and install dangerous software, jeopardising your privacy and security. As a result, if you don’t have a pressing need to disable the lock screen, you shouldn’t do so for the sake of your device’s security and privacy.
Final Words
It takes some time to become used to the Group Policy Editor. Furthermore, it is not available to Windows Home customers. So, if you want to disable the lock screen on Windows 11, you can use the registry modification. However, Winaero Tweaker is a free utility that allows you to adjust Windows through a graphical user interface.